Friday, October 03, 2008
How to Freeeze Brocolli
First cut brocolli up into bite size pieces.
Don't forget to save the stems for juicing.
Bring a pot of water to a boil.
Add brocolli and when it comes back to a boil, time for 3 minutes.
Quickly drain the brocolli and then plunge it into an ice water bath to quickly cool it and stop the cooking.
This process of partially cooking and then quickly cooling is called blanching.
When brocolli has cooled, drain, pack and label.
Friday, September 26, 2008
A confused Apple Tree!
Saturday, September 20, 2008
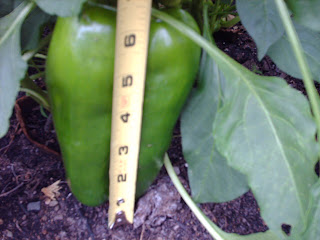
I've never grown peppers this large before!
Sunday, September 14, 2008
Canning Green Beans Step by Step
My green beans are producing late this year. I freeze most of my beans, but Andy seems to like canned beans better so I canned some today.
Here are step by step instructions:
First cut up your beans to the size desired - I frenched mine. You can leave them whole or cut them up - just make sure the pieces are pretty uniform.
This is my frenching machine - it clamps to the table - I have no idea where I got it - I've had it for years.
Sterilize your jars - if you have a dishwasher, that will work - I don't so I use the canner - I fill them with water and bring to a boil.
Pack the raw green beans into the jars - pack them tightly.
Add 1/2 teaspoon of salt per pint (salt is totally optional).
Pour boiling water over the beans - fill up the top of the beans leaving at least 1/2 inch headspace.
Run a knife or spatula inside the jar to release air bubbles that might be trapped. This is a very important step - skip it and you may end up with jars that do not seal.
Wipe the rims of the jars off with a clean cloth.
Put lids and bans on jars. And put into a pressure canner. You cannot can green beans using the open kettle method - you must have a pressure canner.
Follow your manufacturer's directions - mine say to add 3 quarts of boiling water and then the jars (on the rack - never use it without a rack). Put the lid on and lock - but don't put the pentcock on yet - let steam freely come out the valve for 5 to 10 minutes.
After you have vented the steam out, put the pentcock on and watch the pressure - you will start timing once it gets to 11 lbs. Adjust the heat to keep the pressure steady at the 11 lbs.
Set the timer for 20 minutes. After 20 minutes turn off the heat and let the pressure cooker cool naturally. When the pressure drops to zero, remove the pentcock - wait at least 5 minutes and then open the lid - making sure you open it away from you so the steam doesn't burn you. Let the jars cool in the pressure cooker for at least 5 minutes to get used to the temperature change.
Then let cool on a towel. When cool check to make sure that they sealed.
Friday, August 08, 2008
Fresh Salsa
Wednesday, August 06, 2008
I've been trying to make sugar free jelly
I haven't been blogging because I've been in my kitchen experimenting.
The goal - to make an all natural sugar free jelly that tastes good.
The problem - sugar is a big part of what makes jelly "jell" so making one without any sugar is tricky. I don't want to used processed nutrient dead calorie rich white sugar. I also don't want to use artificial sweeteners. It also has to be gluten free and casein free. Since sugar also acts as a preservative in jellies, if I do succeed it will probably have a shorter shelf life.
I didn't want to use honey or maple syrup for fear they would add too much flavor - I really want to taste the fruit.
I decided to use stevia for my first trials. I also picked currants to be the fruit since I have a bumper crop of them this year and I won't be upset if I ruin a batch or two.
Batch #1 was a complete bust. It did not jell at all and wasn't even thick enough to use as syrup. It was also way too tart.
I decided to increase the pectin and the stevia and try again.
Batch #2 was better. It jelled. A soft jell that set up a little firmer in the fridge - definitely a texture I could be happy with. But it was still way too tart.
I'm not sure what to do next. I'm not sure if I need to add more stevia or less. Stevia can get bitter if you use too much so you want to use it sparingly. It wasn't bitter though so I think I could add more - or should I just switch to a different sweetener?
I'm going to mull it over a bit before I give it another go. I'll keep you all posted and post a final recipe and pictures when I get it all figured out.
Tuesday, August 05, 2008
What to do with all of the zucchini.....
I made muffins last night and they were super yummy. If you are not gluten free, you can subsititute regular flour and omit the xanthan gum.
GFCF Zucchini Muffins
1 ½ cups GF Flour (I used Bob’s Red Mill GF Blend)
½ teaspoon Xanthan Gum
1 teaspoon ground cinnamon
½ teaspoon baking soda
½ teaspoon salt
½ teaspoon nutmeg
½ teaspoon baking powder
1 cup raw sugar
1 cup finely shredded zucchini – peel and all
1 egg
¼ cup coconut oil
Zest of one lemon
1 cup chocolate chips (optional – you could also add nuts if desired)
In a medium mixing bowl, sift together the first seven ingredients and set aside.
In another medium mixing bowl beat together sugar, zucchini and egg.
Add oil and lemon zest; mix well.
Stir flour mixture into zucchini mixture.
Fold in chocolate chips.
Spoon batter into muffin cups that are lined with paper liners or well greased.
Bake at 350 degrees for 25 minutes or until toothpick inserted in center comes out clean.
Makes 1 dozen muffins
Sunday, August 03, 2008
Yowsa!
Friday, August 01, 2008
Won't be long now
until the plums are ripe. There are only 7 on the tree - this will be the first year it produces. Regular readers might remember that Dan planted it for me two years ago for my birthday. I'm hoping for another fruit tree for my birthday this year. Hard to believe I will be 50 in less than two weeks!
Thursday, July 31, 2008
The last of the lettuce for awhile
But doesn't it look yummy? I can't complain - it is almost August and to have had lettuce this far into the summer is pretty incredible.
I have two other heads that I let go to seed so hopefully I will have some fall lettuce.
I love having a fresh salad every night for dinner - I don't think you can put too many veggies on the table. It's so much better when what you have in it depends on what you found in the garden that day.
We got a good rain this morning right after I picked this - and we needed it. It has been hot and dry - not good for the garden.
The baby robins hatched. There are two of them and they are looking more and more like birds every day - they grow up so fast - I imagine Mama Robin will be kicking them out of the nest soon. It sure has been fun to watch her.
Wednesday, July 30, 2008
A great website!
It's not exactly gardening related - but I think it is the sort of site that anyone who gardens will appreciate. The site is called We are what we do - it's all about changing the world for the better.
Wednesday, July 23, 2008
From the mouth of babes.........
Don't you just love the conversations kids have with each other? I know I do. My son Andy had his friend Sylvester over today. Andy took Sylvester in the kitchen to show him the zucchini I had just picked from the garden. There conversation went like this:
Andy: Look at these zucchini my Mom picked today.
Sylvester: I don't like zucchini.
Andy: Yes you do.
Sylvester: No I don't.
Andy: You do when it is cooked in cake.
Sylvester: No I don't.
Andy: Yes you do.
Sylvester: I most definitely do not.
Andy: Well, you had seconds of my birthday cake at my birthday party so you must have liked it.
Sylvester: Your birthday cake had zucchini in it?
Andy: Uh huh.
Sylvester: Wow, your Mom is sneaky.
Andy: Well yeah, where do you think I get it from?
So you don't have to search the archives for my recipe - here it is - and if you aren't GFCF, just substitute regular ingredients for the GFCF ones.
Chocolate Zucchini Cake
2 1/2 cups gf flour ( I used Bob’s Red Mill GF Mix)
1/2 cup cocoa
2 1/2 teaspoons baking powder (use aluminum free!)
1 1/2 teaspoons baking soda
1 teaspoon salt
1 teaspoon cinnamon
3/4 cup shortening
2 cups rapadura (you could use regular sugar, but rapadura is healthier)
3 eggs
2 teaspoons vanilla
2 teaspoons grated orange peel (make sure you grate an organic orange - you don't want to know what chemicals are on non organic ones)
2 cups coarsely shredded zucchini
1/2 cup milk substitute (I used Dari Free)
1 cup chopped nuts (I used walnuts, but any would be fine or omit if you are nut free)
Glaze (directions follow)
Preheat the oven to 350°F.
1 Combine the four, cocoa, baking powder, soda, salt, and cinnamon; set aside.
2 With a mixer, beat together the shortening and the sugar until they are smoothly blended. Add the eggs to the shortening and sugar mixture one at a time, beating well after each addition. With a spoon, stir in the vanilla, orange peel, and zucchini.
3 Alternately stir the dry ingredients and the milk substitute into the zucchini mixture, including the nuts with the last addition.
4 Pour the batter into a greased and flour-dusted 10-inch tube pan or bundt pan (use a stainless steel pan – please don’t bake in aluminum. Bake in the oven for about 50 minutes (test at 45 minutes!) or until a wooden pick inserted in the center comes out clean. Cool in pan 15 minutes; turn out on wire rack to cool thoroughly.
5 Drizzle glaze over cake.
Glaze:
Mix together 2 cups powdered sugar, 3 Tablespoons milk substitute, and 1 teaspoon vanilla. Beat until smooth.
Cut in thin slices to serve.
Makes 10-12 servings.
Wednesday, July 16, 2008
A robin built her nest in my apple tree!
I am surprised we haven't had more robin nests in our yard - such a perfect place to build - ripe currants and raspberries near by to eat. And my organic garden is a great source of worms. The bird bath provides a nice drink and a place to cool off.
I had no idea that robins built nests this late in the year so I did some research and found out that they build 2 to 3 nests per year - one in the spring and one in the summer here - probably a third one a little further south. They do not reuse the nest - once the young have left the nest, it will be abandoned.
We are all looking forward to watching the young grow once they hatch.
Tuesday, July 01, 2008
It's looking like it may be a good gardening year after all!
We had a late start and now it is just hot but the garden seems to be weathering it all. And after all, isn't there always something about the weather to complain about? Every year it is too hot, too cold, too wet, too dry or too something.
Mostly my garden is doing great. I had spotty germination on the parsnips and some of my carrots and Andy's sunflower fort has seen better years - but overall it is doing well. We have been eating lettuce and radishes from the garden for some time.
The strawberries were great this year. The currants and raspberries are loaded. The apple tree doesn't have any fruit this year and it looks like I have lost the peach tree - the green that was there has shriveled up and died. But I keep watering the tree hoping beyond hope that there is some life left in there somewhere! LOL! My plum tree has plums for the first time - I can only find 3 - so not a huge harvest but I'll take what I can get and it is still a very young tree.
I snapped a few pics of the garden this morning -
2 views of my raised bed from opposite angles.
Wayahead Tomato
The dead peach tree.
Sunday, June 29, 2008
I picked my first raspberry of the season today
I stood in my raspberry patch and ate it. It was so succulent and juicy. Yum. I savored it since it was the only one ripe. What a wonderful taste of the bounty to come. The raspberries are loaded - it will be a good crop this year.
I think it is also a sign that I am feeling better - I didn't go and get Andy to show it to him or even pick it and take it to him - always Andy first and Mom last. I plucked it and savored it all by myself.
I have no regrets.
I think it is also a sign that I am feeling better - I didn't go and get Andy to show it to him or even pick it and take it to him - always Andy first and Mom last. I plucked it and savored it all by myself.
I have no regrets.
Wednesday, June 04, 2008
Rhubarb Cake
Andy asked me yesterday if I could make a rhubarb cake. What a wonderful idea - I've never made a rhubarb cake before. It was so delicious. Even if you are GFCF, you could make this wonderful cake using regular ingredients.
Ingredients:
½ cup Margarine (I used Earth Balance Buttery Spread)
1 ½ cups Organic Raw Sugar (you could use brown sugar)
1 Egg, Beaten1 teaspoon Vanilla
1/8 teaspoon salt1 cup milk substitute (I used Dari Free)
2 cups GF Flour Blend (I used Bob’s Red Mill GF Mix)
½ teaspoon Xanthan Gum
1 teaspoon Baking Soda
3 cups Rhubarb
½ cup Organic Raw Sugar
½ teaspoon Cinnamon
Procedure:
Slice the rhubarb into 1/4" slices. Cream the margarine and 1 ½ cups sugar; add the egg, vanilla and salt; mix well. Add the milk substitute, flour, xanthan gum and soda; mix well. Stir in the rhubarb. Pour the batter into a well-greased "9x13" cake pan. Mix together ½ cup sugar and 1/2 teaspoon cinnamon; distribute this mixture evenly over the unbaked cake batter. Bake for about 45 minutes in a 350 degree oven.
Monday, June 02, 2008
My garden is thriving!
In spite of the weather and in spite of the fact that I have been depressed and pushing myself to garden - the garden is still doing well.
I just finished planting it this weekend, but lots of stuff is up and doing well.
Just an overall shot of the garden.
And another shot from the opposite corner.
The cabbage plants are really looking nice. They are probably the nicest looking plants in the garden.
The tomatoes are doing well also - they have some transplant shock but are bouncing back and will be growing tall soon.
Two weeks ago I was ready to write the peach tree off as dead - but look it is starting to come to life. Maybe there is hope for it yet.
Thursday, May 15, 2008
Reluctant Gardening continues.....
This is just so unnatural for me - to have to push myself to garden. But keep pushing myself I do hoping I will start enjoying it and because it has to get done.
I have never understood people who don't like to garden - but if it feels like this to them, I do get why they don't do it.
Gardening should be enjoyable. Something you can't wait to do and love to lose yourself in.
I just haven't been myself lately. I blame it all on menopause and hope that I get through it quickly.
But I did have a productive morning regardless.
I staked up my tomatoes that are waiting to be transplanted. I have never had to stake them before transplanting them before - but they were such a tangled mess I was afraid they would all die and I would be left with nothing.
I put up my bean towers - I haven't planted the beans yet - but at least the space is reserved for them now and the string is all strung.
I dug up the raspberries that were trying to invade the tomato area, put down black paper and put up 11 tomato cages and 3 tomato towers. So that area is all ready now for the tomatoes. They still need to be hardened off for a couple more days before transplanting - but at least the area is ready.
Here is a picture of the tomato tower. I have always used cages in the past, but by fall they all end up together as a tangled mess as they grow out of the top of the cages. I thought I would try the tower and pruning method - for three of my plants any way. If I like the way they turn out maybe I will buy more towers next year. If I had somewhere to hang them from I would try the growing them upside down.....
Tuesday, May 13, 2008
Pushing myself to Garden
What is wrong with me? I love to garden but this year I am just not doing it. I pushed myself to get out today for a little while. I don't know if it is just that I have so much else going on or if it is the weather.
But I did have a good gardening day today.
I planted:
Carrots - Scarlet Nantes, Tendersweet, Nelson Hybrid, & Atomic Red
Radishes - Easter Egg Mix
Leaf Lettuce - Lettuce Blend
Parsnips - Hollow Crown
Beets - Red Ace Hybrid
I also set my tomatoes out for a few hours today to get them used to the weather and wind so I can plant them out soon. They have grown so tall that they are touching the lights - the weather needs to cooperate so I can get them out in the ground!
I also took a couple of pictures -
The plum tree is blooming. I am hoping for plums this year - it would be the first year - last year we had a couple of blooms, but no plums.
And strawberry blossoms.
Saturday, May 10, 2008
We got our first weekly box from our CSA
With the crazy weather there hasn't been much gardening to do yet. The plants in the basement are growing very tall and would like to go outside - if only the weather would cooperate!
The plants that are outside are doing well. The lettuce is bouncing back - slowly, but it is bouncing back. The cabbage, brocolli and brussells sprouts are all thriving. The onions and garlic are growing nicely. The strawberries are blooming. The plum tree is about to break out in bloom soon. The apple tree is leafing out but no flowers. The peach is looking healthy and the lilacs will be blooming soon. Hopefully the weather will improve soon and I will be able to get out and get my hands dirty.
In the meantime I have my veggies from my CSA. I couldn't be happier with my new CSA - it is like night and day difference from the one we belonged to last year. We eat a ton of veggies around here so I really hope that between the garden and the CSA I will not have to buy veggies this summer - that would so totally help the grocery bill.
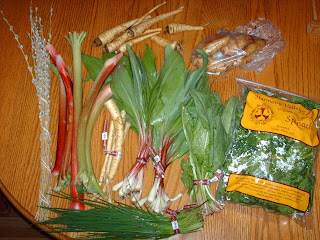
Here is a pic of what was in the box this week. Pussy Willows, rhubarb, parsnips, horseradish, ramps, sunchokes, chives and spinach. I have never had sunchokes or ramps before so I am excited about that. We have already eaten the sunchokes and parsnips - made oven roasted root veggies for dinner last night - yum! And I used the chives in a sour cream/chives dip - again yum!
For those of you local here in the Twin Cities, the CSA I joined this year is Harmony Valley and they still have openings - they are in Wisconsin and make deliveries in Madison and probably other towns as well - so my Wisconsin friends and relatives can check them out also.
Friday, May 02, 2008
Spring is coming slowly
We've had a couple of nice days with highs in the 50s. Now it is supposed to go back to being colder and rainy. Rain I can handle - that makes the garden grow - as long as it's not snow!
The lettuce hasn't bounced back yet. We'll see what the rain does for it. If it doesn't bounce back, I will just plant more. I also get my first box from the CSA next week so hopefully they will be able to keep me in lettuce (we eat a lot of salads in my house).
The Brocolli is looking great - it likes the cold weather.
I transplanted brussels sprouts yesterday and they look nice.
I am going to start setting my cabbage plants out next.
Monday, April 28, 2008
April continues to act more like March!
And I don't want to believe that I saw snow on the ground Saturday morning. I did not take a picture of it - I prefer to be in denial.
I am going to go ahead and garden and pretend that it is a normal spring. I need to do that. I need my sanity.
Here are my Packman Brocolli seedlings. I have them sitting on my patio table (that has been freed from the grape vines) "hardening off" so I can plant them in the garden later this week. They don't mind the cold and will do great.
I planted some lettuce in the garden this weekend (seedlings I had started in the basement) - the plants don't look so hot now but they will bounce back and do fine. They don't mind the cold either. It won't be long now - I'll be eating lettuce and forgetting it was ever cold real soon.
I am going to go ahead and garden and pretend that it is a normal spring. I need to do that. I need my sanity.
Here are my Packman Brocolli seedlings. I have them sitting on my patio table (that has been freed from the grape vines) "hardening off" so I can plant them in the garden later this week. They don't mind the cold and will do great.
I planted some lettuce in the garden this weekend (seedlings I had started in the basement) - the plants don't look so hot now but they will bounce back and do fine. They don't mind the cold either. It won't be long now - I'll be eating lettuce and forgetting it was ever cold real soon.